How to Create a Spaces Bucket
Validated on 28 Jan 2026 • Last edited on 7 Apr 2026
Spaces Object Storage is an S3-compatible service for storing and serving large amounts of data. The built-in Spaces CDN minimizes page load times, improves performance, and reduces bandwidth and infrastructure costs.
DigitalOcean Spaces provides S3-compatible object storage for storing and serving large amounts of unstructured data such as images, videos, audio files, and backups. Each Spaces bucket has its own unique URL and helps you organize content within your account.
Spaces buckets are best suited for static assets and large files rather than databases or other low-latency, transactional workloads. For those use cases, use block storage or local Droplet storage instead.
You can optionally enable the built-in Content Delivery Network (CDN) at no additional cost to cache content globally, reduce latency, and improve load times.
Creating your first bucket automatically starts your Spaces subscription, which ends when you destroy all of your buckets.
Create a Bucket Using the Control Panel
To create a bucket, go to the control panel, in the left menu, click Spaces Object Storage, and then in the top right, click Create Bucket to open the Create a Spaces Bucket page.
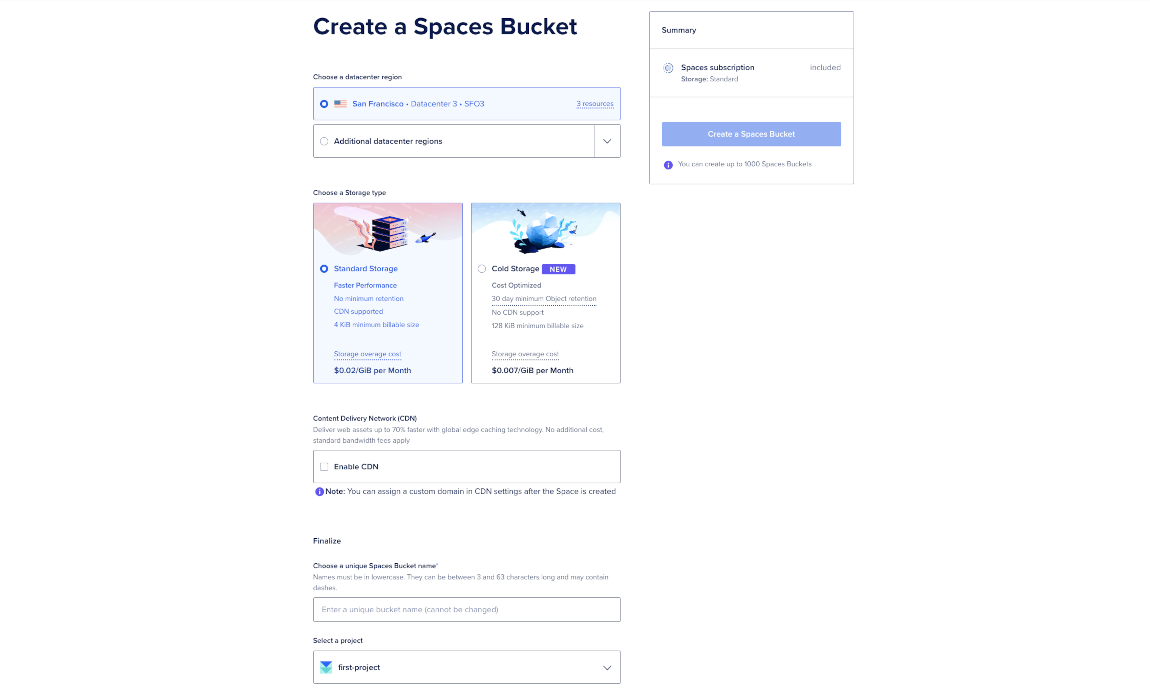
Choose Your Bucket’s Datacenter Region
Under the Choose a datacenter region section, choose the datacenter you want your bucket to live. You can either pick the default datacenter or click Additional datacenter regions to open the dropdown menu for other datacenter options. The datacenter region you choose also becomes part of a bucket’s endpoint URL. See regional availability for Spaces for more information on the available options.
When choosing a datacenter region, select the location closest to the majority of your users or the infrastructure that accesses the bucket most frequently. This minimizes latency and can improve upload and download performance.
If you plan to use Spaces with Droplets, placing the bucket in the same region as those Droplets avoids cross-region latency and additional transfer costs. If you plan to serve content globally, enabling the CDN can reduce the impact of regional distance by caching content closer to end users.
Once a bucket is created, its region cannot be changed. To move data to another region, you must create a new bucket and transfer the objects manually.
Choose Your Bucket’s Storage Type
Under the Choose a Storage type, choose the storage type you want your bucket to belong to. You can either choose Standard Storage or Cold Storage. Spaces Cold Storage buckets can only be created in the control panel, and the storage class cannot be changed after creation.
Spaces offers two storage types designed for different access patterns and performance requirements:
- Standard Storage is optimized for frequent access and low latency. It supports all Spaces features, including CDN integration, static website hosting, bucket policies, and public access.
- Cold Storage is designed for infrequently accessed data that needs long-term, durable storage at a lower cost, with reduced performance and feature availability.
Choose Standard Storage if you plan to:
- Serve assets publicly or through a CDN
- Host static websites
- Access objects frequently or with low latency requirements
- Use bucket policies, CORS rules, or unsigned requests
Choose Cold Storage if you plan to:
- Archive backups, logs, or historical data
- Store data that is rarely accessed
- Optimize for lower storage costs over retrieval speed
- Access data only through signed S3 requests
The storage type cannot be changed after the bucket is created.
Enable Content Delivery Network (CDN)
Under the Content Delivery Network (CDN) section, optionally enable the Spaces CDN. If you click Enable CDN, you can customize the Edge Cache TTL, which is the amount of time the edge servers cache your content. You cannot enable CDN if you chose Cold Storage as your storage type.
The Spaces CDN caches your bucket’s content on edge servers distributed across multiple geographic locations. When enabled, users are served content from the nearest available edge location instead of directly from the bucket’s origin, reducing latency and improving load times.
You may want to enable the CDN if you:
- Serve images, videos, or other static assets to a global audience
- Want faster page loads and lower perceived latency
- Want to reduce bandwidth usage from the origin bucket
When enabling the CDN, you can configure the Edge Cache TTL, which controls how long content remains cached on edge servers before it is refreshed from the origin.
CDN integration is available only for Standard Storage buckets. Spaces Cold Storage does not support CDN integration.
Finalize Set Up
Under the Finalize section, under the Choose a unique Spaces Bucket name sub-section, choose a unique name for your bucket.
The name of the bucket makes up part of its endpoint URL and cannot be changed once it is created. Names must:
- Be unique among all users in all regions. If the name you choose is already in use, a message appears which says “Space already exists.”
- Be between 3 and 63 characters long.
- Contain only lowercase letters, numbers, and dashes.
- Begin with a letter or number. Because bucket names are not typically encrypted in client-side designs, do not use personally identifiable data or other private information in bucket names.
Under the Select a project sub-section, click the project dropdown menu, and then select the project you want to add your bucket to.
View Summary
After setting up your bucket, on the top right corner, under the Summary section, review your set up, and then click Create a Spaces Bucket to create your bucket, which takes you to the bucket’s Files tab, so you can begin uploading files in its root.
You can find the bucket’s origin endpoint on the top right corner of the bucket’s overview page, which is used to configure third-party clients.
If you have data you want to transfer into your bucket, use Flexify.io to migrate your data.
Create a Bucket Using Automation
You can create a bucket using the S3-compatible API like s3cmd or the DigitalOcean API. Bucket creation through automation is permanent (though you can delete the bucket later), so make sure you choose the correct region and bucket name before proceeding. Bucket names must be DNS-compliant and unique within a region.
Spaces Cold Storage buckets can only be created in the control panel, not via the API.
You cannot create a bucket using the DigitalOcean CLI.
Create a Bucket via an S3-Compatible Tool
To create a bucket from the command line, use an S3-compatible tool such as s3cmd or the AWS CLI. For example, with s3cmd, you can create a bucket using the mb command like this:
s3cmd mb s3://<bucket-name>Create a Bucket via the API
To create a bucket via the API, send a PUT request to the bucket endpoint using the S3-compatible API. The bucket’s region is determined by the endpoint hostname you send the request to (for example, nyc3.digitaloceanspaces.com). For more details, see the Spaces API reference.